The primary goal of performing Quests is to obtain Rare Resources. The quality and probability of obtaining anything other than Rare Resources is not worth your efforts or frustrations. You can obtain Keys to open chests, but the drop rate is so low you should not focus on this. The coin drops are so low, you never want to choose those unless it is your only option. Item drops are generally worth much less than the value of the Rare Resources you could take instead.
If you are unfamiliar with probability, items equipped to your Heroes are going to break a lot and break frequently. A small sample of probability is as such: (1) 3% chance item will break 3% of the time. With (2) 3% break chance, at least one will break 5.91% of the time. With (7) 3% break chance items, at least 1 will break 19.2% of the time. The formula is: { (1 - Break Chance ) * (1 - Break Chance) * [Repeat for each item] } = chance it will not break (it is 1 - that number = your break chance).
Items are equipped to Heroes to increase their power. The power granted to an individual Hero does not vary with the Hero Level. The break chance of an item attached to a Hero increases the further the Item Level is from the Hero Level. The break chance is equal in both +Level / -Level difference. An item level that is exactly the Hero level has the lowest break chance possible for that Hero. The higher quality an item, the greater the Power granted and the lesser the break chance (and also the sell value).
The power granted to heroes varies between items and heroes. The higher the item level, the greater the power given to the hero. Better quality items of the same type will provide additional power. Higher quality items of lower level can provide more power than lower quality items of a higher level. For example, Anti-venom is a level 19 Remedy, and Protection Dust is a level 21 Remedy. The Remedy provides 460 power, and the Protection Dust provides 525 Power. A Great Anti-venom provides 552 Power.
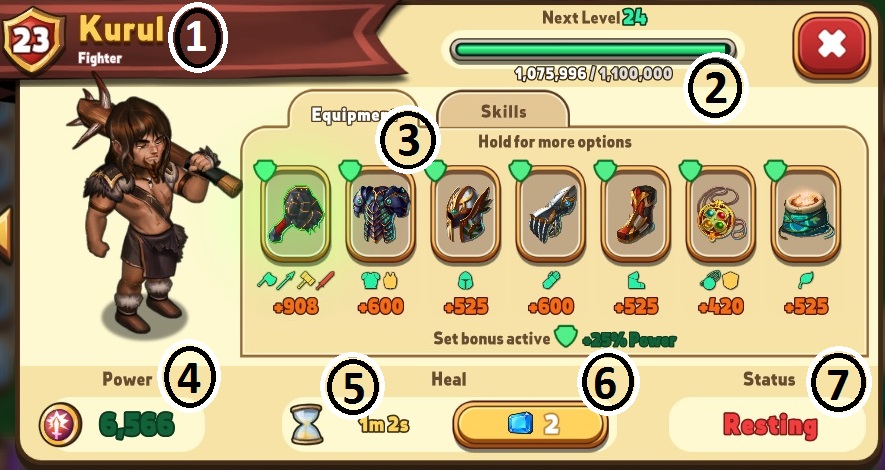
1.) This is Kurul. He is level 23 and he is a Fighter. There are (3) types of Heroes. Fighter, Rogue, and Spellcaster.
2.) This is the experience bar. If your Hero is at Max Level, it will tell you which building to upgrade in Town to increase that Hero's maximum level. You can gain experience by questing or by paying for the Boost of the Hero's building.
3.) These are the 7 pieces of equipment on Kurul. Kurul can only equip the item types listed under each equipment slot, and will only buy items of those types. Kurul has a Green Affinity for Axes and Spears, a Yellow Affinity for Hammers, and Red Affinity for Swords. In general, you want to equip green affinity items. Yellow and red affinity increase break chance, and increase hearts required to suggest or surcharge that item. Affinity does not effect power. If all items are within an appropriate item level to Kurul, the items will grant a +25% total Power bonus to Kurul. If an item slot is empty, you can equip an item from your inventory or hold down to check the market for an item.
4.) This is Kurul's Power if he were to go out on a quest alone, before any skills are applied. This number will include the 7 Item Set Bonus and the bonus granted by the Town Building.
5.) When a Hero has returned from a quest, that Hero may not be used until they have rested.
6.) You may pay gems to remove any Rest or Injured status.
7.) A Hero will be Ready, Resting, Healing, or Busy. Ready means they can go on a quest. Resting and Healing means they will be Ready at the end of the timer. Busy means they are actively on a Quest.

1.) This is the Dead River. The only Rare Resource available here is Royal Bones.
2.) This is the range of Rare Resources you can receive. Repeated tests lead me to believe that there is an equal probability of each result (25% for each of 2, 3, 4, and 5).
3.) This is the quantity of this Rare Resource you currently have. You can store a quantity of each Rare Resource equal to your total Equipment Capacity. Rare Resources do not compete for Equipment slots.
4.) This is the Recommended Power to achieve an A Rating. Each Hero will have their own rating versus the Recommended Power. The Rating determines the success. The actual figures are not know, but for explanatory purposes ratings are approximately A = 99% Success, B = 75% Success, C = 55% Success, D = 35% Success. You are able to fail or succeed at any rating.
5.) This is the amount of experience each adventurer will receive for succeeding.
6.) This is the duration of the quest. This duration can be decreased by the Inn Boost, and once a quest has started, the Inn Boost can reduce the remaining time of the Quest. Rest Times are approximately half of the quest time, and Heal Time (from failure) is approximately double the quest time. Inn Boosts do not effect Rest or Heal times in any way.
7.) There are 5 Bosses at each Quest. Boss fights do not inherently do anything or have special rewards while you are actively fighting them. Defeating a boss will increase the Rare Resource Range (#2 of this image) of all future quests in this location. A boss fight will have a higher Recommended Power (#4 of this picture), and will increase all future Recommended Power. The increase is approximately 10%, but check the Quests page for specific amounts.
.)The shield and number above the (7) indicate the level the hero needs to be to unlock their next companion slot as leader.

Any Hero can be a Leader or a Companion. The Leader is always in the first slot. All other slots are occupied by Companions. Skills reference these locations and only work if the Hero is in the appropriate location. All Heroes add +10% Power to all other Heroes in the party, regardless of their location in the party. This is on top of the +25% Power from Set Bonus and +25% Power from City Boost.
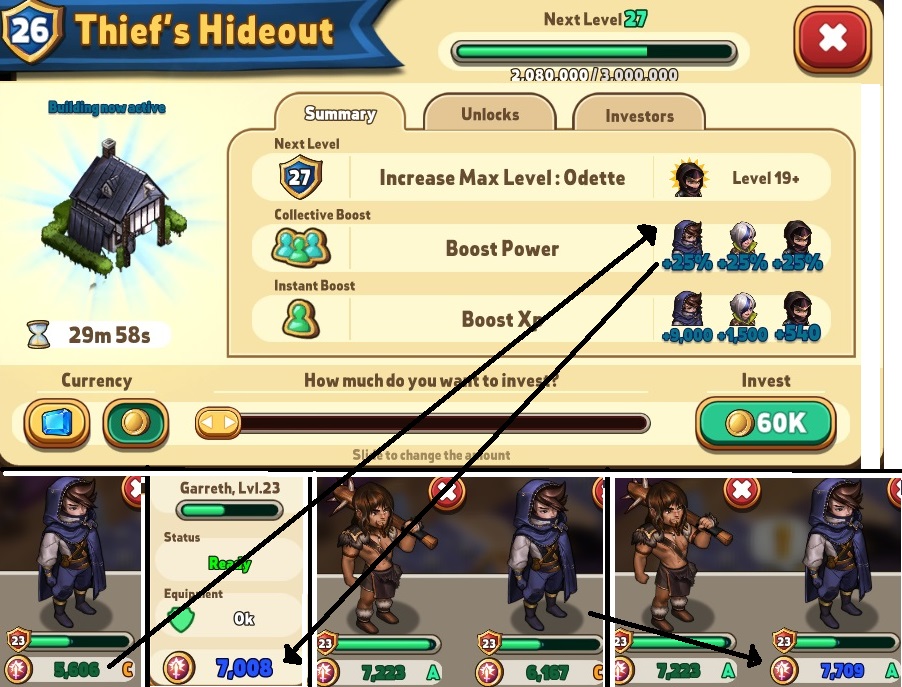
This image is to confirm the following formula for 7 Item Set Bonus Heroes
Solo Power = Hero Base Power + Item Power + ((Item Power) * 0.25 Set Bonus) + ((Hero Base Power + Item Power) * 0.25 Building Bonus).
Individual Party Power = Solo Power + (Solo Power * (0.1 * Party Size -1)).

1.) The Inn provides 2 boosts. This Inn is level 32 and costs 400,000 coins per investment. The first boost is a 30 minute boost that will decrease the duration of all quests that have not yet been started. Each time you invest, it will increase the duration of the boost by 30 minutes, but will not further decrease the percentage decrease of quests. In this example, the quest was originally 2 Hours to begin with, and will be 1 Hour and 35 Minutes for all new quests at this location.
2.) The second effect of the investment is an immediate decrease in remaining time of all active quests. The adventurers were out on 5 quests. The 7-8 minute ones completed immediately and the one with 1 Hour 59 Minutes was reduced by 1 Hour and 20 Minutes to 18 Minutes and 47 Seconds.

1.) These are the results of the above 4 Wyvern Wing Quests. There was 1 Hero with 1 option.
2.) There was also 1 Hero with 1 option.
3.) There were 2 Heroes. Quests with 1-3 Heroes allow you to only choose 1 result from among those Heroes.
4.) There were 4 Heroes. Quests with 4-5 Heroes allow you to choose any 2 results from among those Heroes. 6 Heroes will allow you to choose any 3 results.

Some Quests will give Treasure Chests after all results have been chosen. My guess is approximately a 1% chance to get a chest after a quest.
Some rewards will be gold or items. With the game's current balance, never take items or gold unless you have to.
Some rewards will be keys. My guess is approximately a 0.1% chance or lower.
Questing slots have different probabilities for what quest reward each Hero will bring back. The first slot has a 100% chance for a rare resource. The probability of rare resources decreases further from the first slot. No other information is known about the probability.